JPEG files are a ubiquitous part of the digital landscape. They offer an efficient way to store, share and manipulate images online with minimal loss of quality and size. This simple guide offers all the information necessary for understanding how JPEGs work, as well as tips on how to use them in different scenarios.
For starters, it is important to understand what exactly JPEG files are. A JPEG image file uses compression algorithms to minimize its file size without sacrificing too much quality from the original photo or graphic.
As such, they can be used for everything from low-resolution web graphics to high-quality prints. In addition, since these types of files do not require large amounts of storage space, they are often preferred by users who need to save their photos quickly and efficiently.
In this guide, you’ll learn everything you need to know to use JPEG files effectively, from opening and saving them with ease to taking full advantage of their many features.
So let’s get started!
What Does JPEG Stand For?
JPEG stands for Joint Photographic Experts Group, and it is a type of digital file format used to store images. JPEG files are popularly utilized by computer users because they possess the characteristics of being small in size while providing high-quality image resolution. What’s more, these files can also be compressed without sacrificing quality or clarity.
The most widespread file types associated with this format are JPG and JFIF – both use the same .jpg extension when saved to disk. The advantages of using JPEG as an image file format don’t stop there; its versatility allows for compatibility across different platforms including Windows, Mac OS, Linux, iOS and Android devices.
Plus, due to its popularity among web developers & graphic designers given that webpages load faster with smaller jpeg sizes compared to other file formats such as TIFFs which require larger memory storage space. With all these benefits at hand, it’s no surprise why many people choose this particular file format over others – making JPEG one of the most widely used media formats today.
History Of JPEG
JPEG or Joint Photographic Experts Group is the organization responsible for creating this file format in the 1990s. The group formed in 1986 was a collaborative effort between the International Organization for Standardization (ISO) and the International Electrotechnical Commission (IEC). The main aim of this joint venture was to create a standardised compressed image file format that could be used by all digital imaging devices.
The first version of the JPEG standard was released in 1992, and it quickly gained popularity as it allowed for efficient storage and quick loading of digital images. With the growing popularity of the internet, the JPEG format became the de facto standard for sharing digital images online.
Over the years, the JPEG standard has been updated several times to improve its compression efficiency and support for color depths and resolutions. Today, it remains one of the most widely used compressed image file types, compatible with almost all operating systems and devices.
However, the JPEG format is not without its limitations. Its lossy compression technique can result in a loss of quality over time, and it may not be suitable for all types of images. Lossy compression works by discarding certain data from the original image that are deemed unnecessary or redundant before saving it as a compressed jpeg file.
Nonetheless, the JPEG format has revolutionized the way we store and share digital images and has become an integral part of our digital lives. JPEG files have become the go-to choice for everything from web graphics and photos on social media platforms to scanned documents and medical imagery.
What Are JPEG Files Used For?
JPEG files are a common file format used for storing images. They have the .jpg or .jpeg file extension. JPEGs offer users the ability to compress their image data without sacrificing too much quality, allowing them to save on storage space as well as making it easier to share online.
The JPEG file format provides several advantages such as its small size and versatility when it comes to editing capabilities. It is also widely compatible with both web browsers and most digital camera formats.
Additionally, due to its popularity, there are numerous free online converters available that allow users to easily convert existing photos into this standard file format.
When compared to other popular image file types like TIFF, BMP or PNG, JPEG typically offers the lowest possible file size while still maintaining high levels of image quality.
Is JPG The Same As JPEG?
When it comes to digital images and file extensions, the terms JPG and JPEG are interchangeable. JPG is a commonly used file extension for compressed digital images, while JPEG is an acronym for Joint Photographic Experts Group, the organization that developed the JPG format.
Originally, the file extension was shortened to JPG due to limitations of the DOS operating system and its file naming convention. These days, new operating systems and many software programs use both terms interchangeably, with both file extensions being recognized and processed in the same way.
In summary, while there may be a slight difference in the naming conventions, JPG and JPEG are essentially the same file format and can be used interchangeably in most cases.
Is JPEG Raster or Vector format?
JPEG is a raster image format, meaning that it is made up of a grid of pixels that contain information about color and brightness. This is in contrast to vector images, which use mathematical equations to describe shapes and lines.
JPEG files are typically used for complex images like photographs that have subtle variations in color, brightness, and texture. While raster images like JPEGs are not as scalable as vector images, they are widely used in applications such as digital photography, web graphics, and print design.
Raster images consist of hundreds of thousands of pixels arranged within a set grid pattern that cannot be edited without altering the original data in some way.
Vector images, on the other hand, use lines and curves rather than individual points to create an image which can then be easily modified with no loss of quality during manipulation.
It’s important to note that while JPEG files are raster images, they can be saved at different resolutions which affect the quality of the image. Higher resolution images contain more pixels, resulting in a larger file size but also higher image quality.

JPEG Baseline Vs Progressive: What is it?
JPEG is an image file format used for compressing digital images. The two main types of JPEG compression methods are baseline and progressive.
Baseline JPEGs use an algorithm to separate data into 8×8 blocks, then compress each block using a discrete cosine transform (DCT) before being encoded as bits. This method allows large amounts of information to be represented without excessive loss in quality.
Progressive JPEGs do not employ DCT but instead split up the image into multiple scans at different resolutions, allowing the viewer to see a low-resolution version first while the rest of the image downloads in the background. While they may take longer to download initially compared to baseline, they offer better control over how quickly higher resolution parts appear onscreen.

What Is JPEG Metadata?
JPEG is an image file format that has been widely used on the internet and by cameras for many years.
Metadata associated with JPEG files are important information about the photo or video, such as date of creation, camera settings when taken, device used to take it, etc.
Some examples of commonly used metadata questions include:
1. What type of device was used to capture this image?
2. How much storage space does the file require?
3. What resolution should be used when printing this image?
4. When was this image captured?
Metadata associated with JPEG images can help users better understand what kind of devices were used to create them, how much data they consume in terms of storage space, and other useful information regarding its content.
Typical JPEG Metadata:
Here is a list of the metadata that is typically included in a JPEG file:
-
Image description: A brief description of the image.
-
Date and time the image was created: The date and time that the image was created or modified.
-
Image resolution: The resolution of the image in pixels per inch (PPI).
-
Camera settings: Information about the camera used to capture the image, such as the make and model, shutter speed, aperture, and ISO.
-
Copyright information: Information about the copyright holder and usage rights.
-
GPS data: Location data, including latitude and longitude, can be embedded in the metadata.
-
Image orientation: Information about the orientation of the image, such as landscape or portrait.
-
Color space: Information about the color space used in the image.
-
Software used to edit the image: Information about the software used to edit the image, such as Adobe Photoshop or Lightroom.
-
Keywords: Keywords or tags that describe the content of the image.
JPEG metadata helps users organize and optimize their experience with these types of files without having to hunt through extra options or ask around for answers to their questions. Knowing the answer to some common queries like those listed above can save a lot of time and effort in understanding these kinds of files more efficiently. It is also essential for digital asset management systems used by businesses to organize and manage their image libraries.

How To Use A JPEG?
JPEGs are the most popular file format for storing digital photographs. According to a survey conducted by Apple, over 90% of users store their digital images as JPEG files on Mac computers.
When opening a JPEG with any application, it can appear distorted due to artifacts generated when compressing the image into its original form. To avoid these artifacts, it’s important to use tools like Photoshop to optimize your images before exporting them out as Jpegs.
Additionally, computer programs such as Adobe Lightroom allow you to adjust color saturation, brightness, contrast and sharpness while preserving the quality of the original photo. Ultimately, understanding how to properly use a JPEG file will help enhance your photos and create more dynamic visuals for all kinds of projects.
How to Open a JPG File
Opening a JPEG file is simple and can be done using any image viewer or editor software. Here are some of the most commonly used methods:
-
Double-click on the JPG file to open it in the default image viewer on your computer.
-
Right-click on the JPG file and select “Open With” to choose from a list of available programs to open the file.
-
Open an image editor program such as Adobe Photoshop, GIMP, or Canva, and then open the JPG file from within the program.
Why is my JPG file not opening?
Opening a JPG file can be a frustrating experience if you don’t have the right software or tools. Here are some possible reasons why your JPG file might not be opening:
-
Lack of compatible software: JPG files require specific programs or apps to open and display properly. If you don’t have the right software installed on your device, the file may not open or appear as intended.
-
Lossy compression: JPG files use lossy compression, which means that some data may be lost if the image is resized too much. This can result in image distortion or poor quality.
-
Corrupted file: If the JPG file is corrupted, it may not open or may appear distorted. This can happen if the file was not properly saved or transferred.
Fortunately, there are several options for opening JPG files, such as:
-
Picture-editing software: Most photo-editing software can open JPG files, including Adobe Photoshop, GIMP, and PaintShop Pro.
-
Online tools: There are several free online tools that can help you open and view JPG files, regardless of their size or format. Simply search for “online JPG viewer” to find one.
-
Convert to a different format: If you’re still having trouble opening the JPG file, try converting it to a different file format such as PNG or GIF. There are several free file conversion tools available online that can help you do this.
If you are having trouble opening a JPEG file, there could be several reasons why. Here are some of the most common issues and their solutions:
-
The file may be corrupted. Try opening the file on a different device or using a file recovery tool to repair the file.
-
The file extension may be incorrect. Make sure that the file extension is “.jpg” or “.jpeg” and not “.png” or another format.
-
The file may be too large. Try resizing the file or converting it to a lower quality format.
By understanding the possible reasons why your JPG file may not be opening and exploring different options for opening or converting the file, you can ensure that you’re able to access your image files without any issues.
How to Edit a JPG File
As a popular image format, JPG (or JPEG) files are used for many purposes.
It is important to understand the basics of how to edit these types of images so that you can make them look their best.
When editing a JPG file, it is possible to do things like adjust the brightness and contrast, enhance edges or colors, sharpen details, resize, rotate, crop, overlay other elements such as text or graphics, add watermarks or frames – basically whatever needs to be done in order to create the desired visual effect.
All of these modifications should take into account human eye perception since what looks good onscreen may not necessarily appear so when printed out.
Editing a JPEG file is easy and can be done using any image editor software. Here are some of the most commonly used methods:
-
Open the JPG file in an image editor such as Adobe Photoshop, GIMP, or Canva.
-
Use the editing tools to make changes to the image, such as cropping, adjusting the color or brightness, or adding text.
-
Save the edited image as a new JPEG file or another compatible file format such as PNG or TIFF.
When properly edited with the right tools and techniques, a JPG file can achieve great results that will impress viewers both online and offline.
How To Make A JPEG Smaller?
Reducing the size of a JPEG image is important if you want to save disk space or make it easier to share online. Here are some tips to help you achieve this:
-
Use compression tools – there are many online and offline tools available that can compress your JPEG files without sacrificing too much quality.
-
Resize your image – reducing the dimensions of your image can significantly reduce the file size. However, you should be careful not to resize it too much, as this may result in a pixelated or blurry image.
-
Adjust image quality settings – you can adjust the quality settings of your JPEG file to reduce its size. Be aware that lower quality settings can result in a loss of detail and color.
-
Remove unnecessary data – you can remove unnecessary data such as metadata and color profiles to reduce the size of your JPEG file.
-
Convert to a different format – if all else fails, you may want to consider converting your JPEG file to a different format such as PNG or GIF which may result in a smaller file size.
By following these tips, you can reduce the size of your JPEG files without sacrificing too much quality.
How does JPEG compression work?
JPEG uses a lossy compression algorithm to reduce file sizes of photographs and other kinds of multimedia content without significant reduction in quality. This makes JPEG an ideal choice for applications where image size needs to be kept short such as web development or emails.
The JPEG standard utilizes DCT to compresses images. DCT stands for discrete cosine transform and it is a method used in JPEG compression to reduce the file size of an image while maintaining acceptable levels of detail and sharpness.
An analogy for DCT can be compared to a chef preparing a soup with many ingredients. The chef knows that some ingredients are more important than others, like spices, and will add those in specific amounts to enhance the flavor. Similarly, DCT identifies the important details in an image, like texture and contrast, and keeps those while removing unnecessary information. This allows for a smaller file size without significant reduction in quality.
Compression is achieved by throwing out these high frequencies and keeping only those that are necessary to maintain acceptable levels of detail and sharpness. In other words, compression is like packing a suitcase – you try to fit as much as you can while still keeping it organized and easy to carry. In JPEG compression, the algorithm gets rid of some of the less important details in the image to reduce its file size, while still maintaining an acceptable level of quality.
To further compress further without compromising picture quality, quantization tables are used.
Quantization tables are like a filter or strainer. They help the algorithm decide which details to keep and which ones to discard. Depending on the image, some details may be more important than others. For example, in a landscape photo, the sky may not have as many important details as the foreground, so the quantization table can be adjusted to preserve more details in the foreground and fewer in the sky. However, if the compression is set too high, it can lead to artifacts or visual distortions, similar to when a filter is used too much and changes the taste of the food. This can be fixed by adjusting the settings or using special software tools designed for this purpose.
Is JPEG lossy or lossless?
JPEG files can be divided into two distinct categories – lossy and lossless.
Lossy compression algorithms are designed to reduce the size of a file by removing redundant data, while still keeping the essential characteristics intact. By doing so, smaller files can be created without significant quality degradation.
On the other hand, lossless compression techniques offer no reduction in file size but do not compromise on any of the original information contained within it. This type of compression is typically used when dealing with text or images that require exact replication for accurate viewing or manipulation.
Grouping JPEGs into either category requires careful consideration about how each will affect an intended application’s visuals or functionality.
For example, if a user needs to edit a high-resolution image multiple times in order to produce specific results, then they should opt for a lossless format as this method retains all details throughout each successive iteration.
Conversely, if their main goal is to decrease storage space while displaying images online, then they would benefit from using a lossy format since it produces much smaller versions at acceptable levels of quality.
How to Reduce the Size of a JPEG
There are a few measures one can take in order to reduce the size of a JPEG without sacrificing too much quality. The first step is to adjust the settings within your photo editing program when exporting/saving as a JPEG. Generally speaking, decreasing both ‘quality’ and ‘resolution’ will result in smaller files; however, doing so may cause some degradation in sharpness and clarity if taken too far.
Quality refers to how clear and sharp an image appears, while resolution refers to the number of pixels that make up the image.
Think of it this way: imagine a painting on a large canvas versus the same painting on a smaller canvas. The larger painting will have more detail and texture, and appear sharper and clearer. This is similar to how resolution works in digital images. The higher the resolution, the more pixels are used to create the image, resulting in a larger file size and higher quality appearance.
When adjusting the settings in a photo editing program to reduce the size of a JPEG, decreasing both the quality and resolution will result in smaller files. However, if taken too far, this can cause a degradation in sharpness and clarity, just like if you were to shrink a painting too small.
To find the right balance between image size and acceptable quality, it’s important to consider the specific situation and intended use for the image. Additionally, many programs offer additional options such as subsampling. Subsampling can be compared to making a photocopy of a document using a lower quality setting. When making a photocopy with a lower quality setting, the machine takes a picture of the document with fewer dots per inch (DPI) than a higher quality setting. This results in a copy that is still readable, but may not have as much detail or sharpness as the original document. Similarly, subsampling in JPEG compression reduces the amount of detail in an image to create a smaller file size while still retaining the essence of the image.
By understanding these concepts and adjusting the appropriate parameters prior to saving and using appropriate compression techniques, users can successfully shrink the size of any JPEG while preserving most of its original quality.
However, if you are looking a for a simpler way to convert without requiring technical knowledge, there are free online drag and drop tools that compress JPG files for free.
Online Tools to Compress a JPG File for Free
If you need to compress a JPG file to reduce its file size for web optimization or faster email attachments, there are many free online tools available that can help. Keep in mind that cropping images and resizing images can go a long way in reducing the size of the JPEG files before using these online tools.
Here are some of the best free online tools to compress JPG files:
-
TinyPNG: TinyPNG is a popular online tool that uses lossy compression to reduce the file size of PNG and JPEG images. It can compress images up to 5 MB in size for free.
-
Compress JPEG: Compress JPEG is a free online tool that uses lossy compression to reduce the file size of JPEG images. It can compress images up to 20 MB in size for free.
-
Kraken.io: Kraken.io is a versatile online tool that uses both lossy and lossless compression to reduce the file size of JPEG and PNG images. It can compress images up to 1 MB in size for free.
-
Optimizilla: Optimizilla is a simple online tool that uses lossy compression to reduce the file size of JPEG and PNG images. It allows you to compress up to 20 images at once, and offers a variety of compression levels to choose from.
-
ImageResize.org: ImageResize.org is a free online tool that allows you to resize and compress JPEG images. It can compress images up to 10 MB in size for free, and offers a variety of compression levels to choose from.
-
JPEG.io: JPEG.io is a free online tool that uses lossy compression to reduce the file size of JPEG images. It can compress images up to 10 MB in size for free, and offers a variety of compression levels to choose from.
It’s important to note that all these tools come with some limitations; they may not be able to handle larger image files or more complex graphics, so it’s best practice to always test them out before using them in production environments.
Additionally, if you need further assistance understanding how each works, most sites provide helpful tutorials or support forums where experts can answer any questions you may have about optimizing JPEGs using these services.
How to Convert a File to JPEG
JPEG files are a popular format for photographs and web graphics and converting them to use on your website is fairly straight forward process.If you have a file in another format that you need to convert to a JPEG, there are several ways to do so.
How to convert a PDF file to JPG
-
Open the PDF file in Adobe Acrobat or Adobe Reader.
-
Click “File” and then “Export To” followed by “Image” and then “JPEG”.
-
Choose the resolution and image quality you want for the JPEG file.
-
Select the location where you want to save the file, and click “Save”.
How to convert a PNG file to JPG
-
Open the PNG file in an image editing software such as Adobe Photoshop or GIMP.
-
Click “File” and then “Save As”.
-
Select “JPEG” as the file format from the dropdown menu.
-
Choose the compression level and image quality you want for the JPEG file.
-
Select the location where you want to save the file, and click “Save”.
How to convert a WEBP file to JPG
-
Open the WEBP file in an image editing software such as Adobe Photoshop or GIMP.
-
Click “File” and then “Save As”.
-
Select “JPEG” as the file format from the dropdown menu.
-
Choose the compression level and image quality you want for the JPEG file.
-
Select the location where you want to save the file, and click “Save”.
How to convert a Word file to JPG
-
Open the Word file in Microsoft Word.
-
Click “File” and then “Save As”.
-
Choose “JPEG” as the file format from the dropdown menu.
-
Select the location where you want to save the file, and click “Save”.
How to Convert Image to JPG
-
Open the image file in an image editing software such as Adobe Photoshop or GIMP.
-
Click “File” and then “Save As”.
-
Select “JPEG” as the file format from the dropdown menu.
-
Choose the compression level and image quality you want for the JPEG file.
-
Select the location where you want to save the file, and click “Save”.
By following these simple steps, you can easily convert files to JPEG format for use in photographs, web graphics, and more.
Online Tools to Convert a File to JPG for Free
Now that you know how to convert a file into a JPEG, let’s look into some online tools available for free that can help with this task.
Here are some of the best free online tools to convert files to JPG format:
-
Zamzar: Zamzar is a popular online file conversion tool that supports over 1,200 different file formats, including PDF, PNG, and WebP. It offers free conversion of files up to 50 MB in size.
-
Convertio: Convertio is another popular online file conversion tool that supports a wide range of file formats, including PDF, PNG, and WebP. It offers free conversion of files up to 100 MB in size.
-
Online Convert: Online Convert is a free online file conversion tool that supports a variety of file formats, including PDF, PNG, and WebP. It offers free conversion of files up to 100 MB in size.
-
CloudConvert: CloudConvert is a versatile online file conversion tool that supports over 200 different file formats, including PDF, PNG, and WebP. It offers free conversion of files up to 25 minutes in duration.
-
Online-Convert: Online-Convert is a free online file conversion tool that supports a wide range of file formats, including PDF, PNG, and WebP. It offers free conversion of files up to 100 MB in size.
-
Convertimage.net: Convertimage.net is a simple online tool that allows you to convert image files to JPEG format. It offers free conversion of files up to 10 MB in size.
By using these free online tools, you can easily convert files to JPEG format without needing to download any software or pay for specialized services.
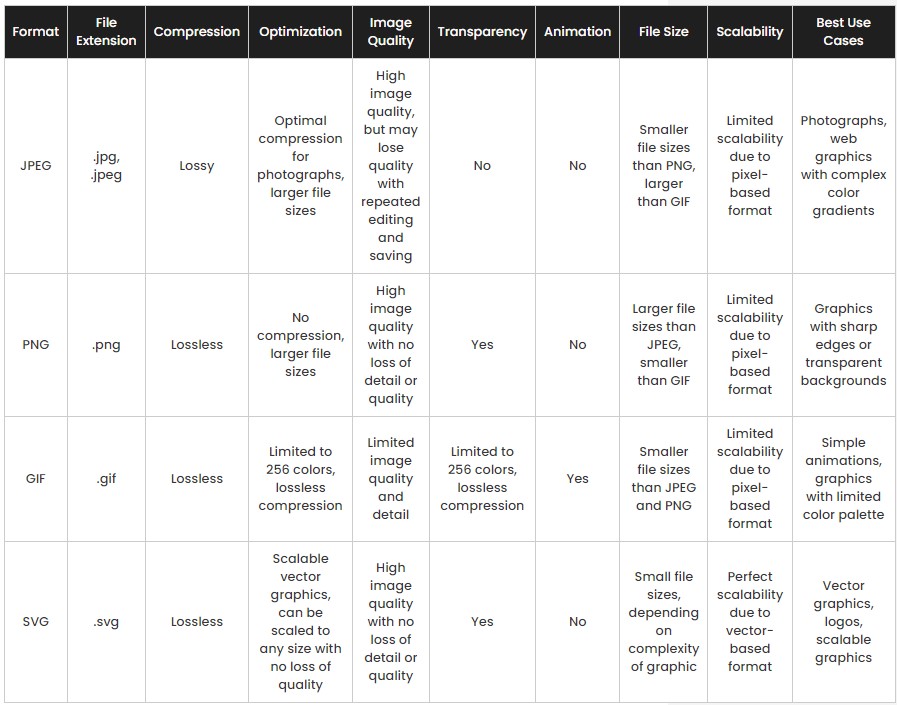
Comparison Of Graphics File Formats For WordPress
When choosing a graphic file format for WordPress, there are several factors to consider. WordPress file types for images typically fall into these four formats: PNG, JPEG, GIF, and SVG.
JPEG is often the preferred choice due to its wide compatibility and support on most devices; however, other formats such as PNG may offer higher resolution images or better transparency options.
Here is a quick look at the pros and cons and when to use these formats on your website.
How to Delete Unused Images in WordPress: JPEG Files
As you add more media to your WordPress site, the media library can become cluttered with unused files, taking up valuable server space and slowing down your site. Removing these files can help improve site performance and reduce clutter.
To remove unused JPEG files from your WordPress media library, follow these steps:
-
Log in to your WordPress dashboard and navigate to the media library.
-
Scroll through the media library to identify any unused JPEG files.
-
Click on each unused file to open its details page.
-
Check the “attachment details” section to see if the file is attached to any posts or pages. If it is not attached, proceed to step 5. If it is attached, you will need to remove the file from the post or page before proceeding.
-
Click on the “delete permanently” button to remove the file from your media library.
It’s important to note that removing unused files is a manual process and can be time-consuming, especially if you have a large media library. However, there is a plugin called Media Hygiene that can make this task much easier.
Media Hygiene is a plugin specifically designed to help website owners clean up their media library by detecting and deleting unused images. The plugin works by analyzing the website’s posts, pages, and custom post types and identifying any images that are no longer being used. It then presents a list of these unused images, allowing the user to select which ones to delete.
One of the advantages of Media Hygiene is that it allows the user to preview the unused images before deleting them. This way, users can avoid accidentally deleting important images or removing images that may be needed in the future.
Media Hygiene also offers several other features to help users manage their media library more efficiently, such as the ability to:
-
Filter images by file type, size, or date
-
Bulk select images for deletion
-
Download unused images before deletion
-
Exclude certain folders or directories from the search
By using the Media Hygiene plugin, website owners can keep their media library tidy and organized, reducing the risk of errors and improving website performance.
Conclusion
JPEG files are a popular format for photographs and web graphics due to their relatively small file sizes and high image quality. They are ideal for use on the web and in digital media due to their wide compatibility with most devices and platforms.
While there are other file formats available, such as PNG, GIF, and SVG, each has its own unique features and best use cases. By understanding the differences between file formats, you can choose the best format for your specific project.
In addition, there are many free online tools available to help you optimize, compress, and convert JPEG files. These tools make it easy to work with JPEG files without needing to download any specialized software or pay for expensive services.
Overall, JPEG files continue to be a staple in the world of digital media and are an essential tool for photographers, web designers, and graphic designers alike.
Frequently Asked Questions
Can JPEG Files Be Edited?
Absolutely. However, how well you can edit JPEG files depends on what software and tools are being used. Some programs allow full editing capabilities while others do not.
With that being said, there are many applications out there to choose from where you can edit your JPEG files that will suit your needs.
What Is The Difference Between JPEG And PNG Files?
JPEG and PNG files are two of the most commonly used image file formats available. While they both provide similar features, such as high-quality, compressed images that can be easily shared or stored with minimal loss of quality, there are distinct differences between them.
JPEG files generally use a ‘lossy’ compression algorithm to reduce file size which allows for smaller files but results in less detailed images than their PNG counterparts. On the other hand, PNG uses a ‘lossless’ compression method which preserves more detail compared to JPEGs but usually requires larger file sizes.
Ultimately, it depends on your intended purpose and desired outcome when determining whether you should use JPEG or PNG format for an image.
How Can I Open A JPEG File?
According to recent statistics, 78% of images found online are JPEG files.
Opening a JPEG file requires the use of an image viewing program such as Adobe Photoshop or Microsoft Paint; these programs allow users to open and view any type of image file format with ease.
Although the process may seem intimidating at first, opening a JPEG file is actually quite simple.
All that needs to be done is selecting the file in question from its folder on your computer and double-clicking it – this will cause the default photo viewer application for your operating system to open up automatically, displaying the contents within.
What Is The Maximum Resolution Of A JPEG File?
A JPEG file is a digital image format that supports up to 24-bit color, and the maximum resolution of one such file can range from 0.5 megapixels to 64 megapixels depending upon its purpose and usage.
This allows an incredibly wide variety of sizes for these images, especially when compared with other common digital formats like GIFs or TIFFs. Furthermore, because they are so flexible in their size requirements, JPEG files can be used effectively as small thumbnails on websites or as full-size prints for artwork.
Is There A Way To Reduce JPEG File Size Without Compromising Image Quality?
From resizing and cropping photos, to using online tools like TinyPNG and CompressJPEG, you can reduce your JPEG file sizes in no time.